
Tattoo Ink Blog - Mastering the Flow: Creating Convincing Liquid and Fluid Effects in Tattoos
The most realistic liquid in a tattoo isn't just an image of water; it's a carefully engineered optical illusion that weaponizes the physics of light against the limitations of human skin. You've likely felt the frustration of a "wet" look losing its luster after six months or struggled to balance high-contrast blacks with the soft gradients required for true transparency. It's a common hurdle for professionals pushing the boundaries of realism in 2026, especially as the "Liquid Metal" and "Chrome" trends dominate the industry aesthetic. Mastering the art of creating convincing liquid and fluid effects in tattoos requires more than just a steady hand; it demands a deep understanding of pigment dispersion and light refraction.
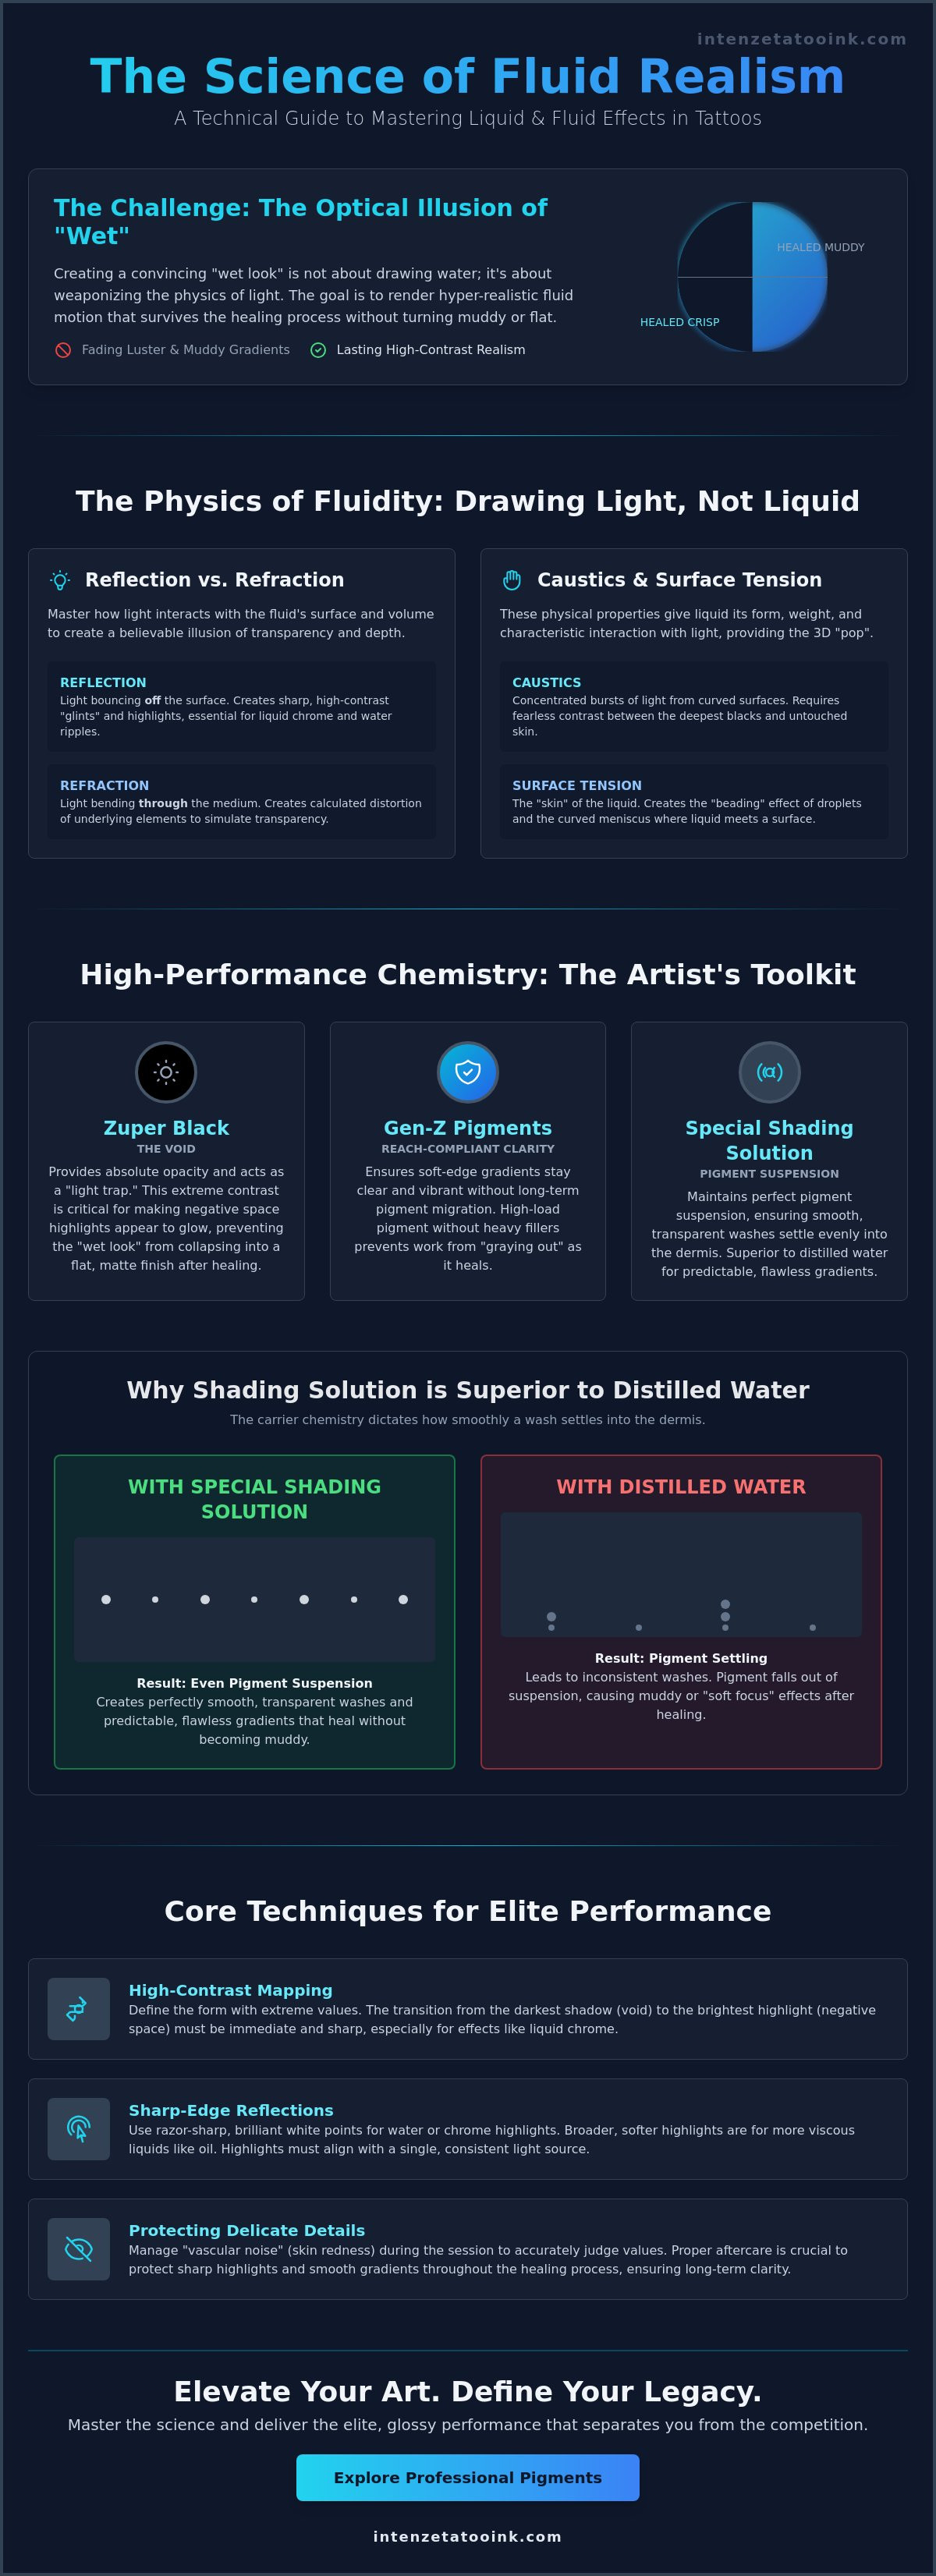
We're here to bridge the gap between artistic vision and scientific execution. You'll learn the technical precision and pigment science required to render hyper-realistic water and fluid motion that survives the healing process without turning muddy. This guide explores the specific use of tools like our Special Shading Solution for transparency and explains how to apply high-contrast Zuper Black to anchor your highlights. We'll break down the physics of light in skin so you can deliver the elite, glossy performance that defines a master's legacy.
Key Takeaways
- Master the science of caustics and light refraction to transform flat skin into a dynamic, three-dimensional liquid surface.
- Discover the technical workflow for creating convincing liquid and fluid effects in tattoos, focusing on high-contrast mapping and sharp-edge reflections.
- Learn why industry standards like Zuper Black and REACH-compliant Gen-Z pigments are critical for achieving the deep "void" and long-term clarity required for fluid realism.
- Identify why using Special Shading Solution is superior to distilled water for maintaining pigment suspension and ensuring perfectly smooth, transparent washes.
- Gain professional insights into managing "vascular noise" during the session and protecting the delicate details of fluid effects throughout the healing process.
The Physics of Fluidity: Understanding Light and Motion in Skin
Liquid is the ultimate test of an artist's grasp on light and shadow. It possesses no inherent shape, instead taking the form of its container or the forces acting upon it. Creating convincing liquid and fluid effects in tattoos demands that you stop drawing "water" and start drawing the way light interacts with a specific volume. This is a scientific challenge as much as an artistic one. You must account for caustics, which are the envelopes of light rays reflected or refracted by a curved surface. In skin, rendering these concentrated bursts of light requires a fearless approach to contrast, where the deepest blacks of the "void" meet the untouched negative space of the skin.
The "Wet Look" formula relies on a precise ratio of high-load pigment to skin integration. If the transitions are too abrupt, the effect looks like a sticker. If they're too soft, the liquid looks muddy or "soft focus" after healing. Success depends on understanding your tattoo ink composition, as the pigment dispersion and carrier chemistry dictate how smoothly a wash will settle into the dermis. Achieving this balance is what separates a flat design from a hyper-realistic masterpiece that appears to move with the client's body.
Refraction vs. Reflection in Tattoo Realism
Light behaves differently depending on the fluid's density. Reflection occurs when light bounces off the surface, creating the sharp, high-contrast "glints" seen in liquid chrome or the top of a ripple. Refraction is more complex; it's the bending of light as it passes through a medium. To sell the illusion of transparency, you must distort the "submerged" elements of the tattoo. In the context of tattooing, refraction is the calculated distortion of underlying anatomy or background elements to simulate light passing through a transparent volume. Mastering this requires a sophisticated use of skin-tone integration, where the natural color of the client's skin acts as the "middle value" of the liquid itself.
The Illusion of Surface Tension
Surface tension is the "skin" of the liquid. It's the force that allows a droplet to bead rather than flatten. To render this, you must map the meniscus, which is the curve where the liquid meets a solid surface. This tiny, shadowed edge provides the 3D "pop" that makes a water droplet look like it's sitting on top of the skin. The weight of the fluid also dictates the thickness of your highlights. A heavy, viscous liquid like oil will have broader, softer highlights, while water or chrome requires razor-sharp, brilliant white points. Use "beading" effects to create a sense of weight and motion, ensuring the highlights always align with a single, consistent light source to maintain the optical illusion.
Essential Tools and Pigment Selection for Fluid Realism
High-performance fluid realism isn't just about your hand speed; it's about the chemistry sitting in your ink caps. You can't simulate the depth of a deep pool or the brilliance of molten metal with inferior materials that blur or gray out over time. Creating convincing liquid and fluid effects in tattoos requires a black that acts as a true light trap. Zuper Black serves as the industry standard for this "void," providing the absolute opacity needed to make your negative space highlights appear to glow. Without this extreme contrast, the "wet" look collapses into a flat, matte finish once the skin heals.
This mastery of contrast is rooted in the classic technique to represent light and shadow, known as chiaroscuro. In tattooing, this means using high-load pigments to define the form. When you're rendering liquid chrome, the transition between the darkest shadow and the brightest highlight must be immediate and sharp. Using sterile, laboratory-grade inks ensures that these micro-details remain crisp. As of 2026, compliance with MoCRA and REACH standards is no longer optional; it's a mark of professional integrity. Using REACH-compliant pigments like the Gen-Z range ensures that your soft-edge gradients stay clear and vibrant without the risk of long-term pigment migration.
The Power of High-Load Pigment
Pigment concentration is the secret to longevity in fluid tattoos. Generic inks often rely on heavy fillers that cause the work to "gray out" as the macrophages in the skin settle. Zuper Black’s high pigment load creates a punch that remains dark for decades. This density is vital for liquid effects because it allows you to use our Special Shading Solution to create a spectrum of washes that maintain their suspension. When your pigment dispersion is uniform, every drop of your wash delivers equal saturation, preventing the "salt and pepper" look that ruins a smooth water transition. To see the difference in your own work, you can explore the Gen-Z collection for elite-level performance.
Needle Physics for Soft Gradients
Your needle choice dictates the "texture" of the liquid. For the sharp, tension-filled edges of a ripple or the crisp outline of a bubble, a tight 3RL is your best tool. It allows for the precision mapping required to define the meniscus. However, for the deep, swirling gradients of a pool, Soft Edge Magnums are essential. They allow you to layer pigment without creating harsh "stop marks." The taper of the needle also plays a role; a long taper is ideal for "pepper shading" light refractions, while a medium taper helps pack the solid blacks of a reflection. Controlling your depth is the final piece of the puzzle. Shallow passes create the "ghosting" needed for transparent bubbles, while deeper, saturated passes anchor the "gloss" that makes the viewer want to touch the skin.
Master Techniques: From Liquid Chrome to Water Droplets
Every fluid has a unique fingerprint. To excel at creating convincing liquid and fluid effects in tattoos, you must recognize that water, chrome, and viscous liquids like blood require entirely different technical strategies. Water relies on transparency and refracted light; chrome is a game of pure, high-contrast reflection; and viscous fluids demand a sense of weight and surface tension. To keep these intricate effects from blurring into a singular mess over time, using Intenze Color Lining Solution is a professional necessity. It stabilizes the pigment within the dermis, ensuring that the sharp boundaries of a ripple or the tight edge of a drip don't expand into the surrounding tissue.
The "ghosting" technique is the secret to rendering transparency. This involves using extremely diluted washes to suggest the presence of a bubble or a submerged object without over-saturating the skin. You're not tattooing the water itself; you're tattooing the way the water distorts the world around it. For thicker, more viscous fluids like blood or honey, the drip moves slower and holds more mass. These fluids are less about light passing through and more about the "bead" and the way the highlight sits on a rounded, opaque surface.
Step-by-Step: The Hyper-Realistic Water Drop
Creating a 3D water drop is a four-step process that relies on the physics of light we discussed in previous sections. Follow this workflow for a consistent "pop":
- 1. The Dark Crescent: Map a crescent-shaped shadow at the base of the drop using a mid-tone wash. This defines the volume.
- 2. The Shadow Anchor: Place a darker shadow on the skin surface directly below the drop. This separates the fluid from the body.
- 3. The Light Window: On the side opposite the shadow anchor, leave a "window" of lighter skin tone or a very soft wash to simulate light passing through the liquid.
- 4. The Specular Highlight: Apply a single, sharp point of pure white at the top of the drop. This is the "wet" pop that completes the illusion.
The 'Liquid Metal' Effect
Metallic fluids like chrome or mercury are the ultimate test of contrast. Unlike water, there is zero transparency. You are essentially tattooing a mirror. The "Horizon Line" trick is vital here; by creating a distorted, high-contrast line through the center of the fluid, you simulate the reflection of a sky and ground. This provides an immediate sense of environment. For these seamless metallic transitions, the Bob Tyrrell Black & Grey Set is the industry standard. It provides the specific increments of gray needed to move from the "void" of Zuper Black to the brilliant highlights of the metal's surface. In metallic effects, hard edges are often more important than soft shading. A sharp, clean line between black and white creates the "snap" that the human eye reads as a polished, reflective surface.
The Role of Shading Solutions and Viscosity in Smooth Transitions
Many artists make the mistake of using distilled water to dilute their ink. This is a significant technical error. Water has a low viscosity and high surface tension, which causes pigment particles to clump or fall out of the solution almost immediately. When you're creating convincing liquid and fluid effects in tattoos, you need a carrier that maintains perfect pigment suspension from the first dip to the last. Intenze Special Shading Solution is engineered to mimic the chemical viscosity of the ink itself. This ensures that every drop in your cap has the exact same saturation. Without this level of consistency, your gradients will appear choppy or pixelated, which instantly ruins the illusion of a smooth, flowing surface.
The "slip" of the ink refers to how easily the needle moves through the skin and how the pigment disperses upon entry. High-quality shading solutions provide a lubricated path, allowing the needle to glide and create the ethereal "mists" essential for background water or steam. A 5-tone gray wash scale is the professional standard for building deep fluid depth. By starting with Zuper Black and stepping down through five calculated dilutions, you create a roadmap for the eye. This allows you to move from the light-trapping "void" of deep water to the most delicate, transparent ripples without losing the structural integrity of the design.
The Chemistry of the Wash
The science of the wash goes beyond simple aesthetics. Intenze Special Shading Solution is formulated to interact harmoniously with the skin’s natural lipid barrier. This compatibility facilitates faster pigment entry and reduces the inflammatory trauma associated with multiple passes. During long realism sessions, which frequently exceed 6 hours in 2026, generic dilutions tend to dry out in the cap. Our solution contains specific humectants that prevent this evaporation, keeping your palette fresh and your viscosity stable. This stability is the secret to achieving those untraceable gradients that are vital for creating convincing liquid and fluid effects in tattoos that look like they were breathed onto the skin.
Mixing for Transparency
Precision mixing is the hallmark of a master. We recommend a standardized ratio guide for multi-layered fluid depth: use a 25% dilution for heavy transitions, 50% for mid-tones, and 75% for the most ephemeral ghosting effects. For the most seamless flow, utilize the "Wet-on-Wet" technique. This involves applying a light wash over a still-damp area of a darker shade, allowing the pigments to blend within the dermis itself. Intenze Special Shading Solution preserves the soul of the pigment during dilution, ensuring that even the lightest wash retains its intended hue and structural integrity. To ensure your work maintains this elite level of performance, invest in professional-grade Shading Solution for your next project.
Preserving the Flow: Longevity and Aftercare for Fluid Tattoos
The "Blur Factor" is the silent killer of hyper-realism. While the technical execution of creating convincing liquid and fluid effects in tattoos is a triumph of skill, the healing process is where the true battle for longevity is won or lost. Fluid effects rely on micro-gradients and razor-thin highlights that are incredibly susceptible to pigment migration during the initial inflammatory phase. If the skin's immune response is too aggressive, the macrophages will relocate those carefully placed particles, turning a crisp chrome reflection into a muddy smudge. Your choice of pigments, such as our REACH-compliant Gen-Z range, provides the stability needed to resist this "micro-blurring," but the work doesn't end when the machine stops.
Managing the canvas during the session is equally vital. "Vascular noise," or the localized redness caused by needle trauma, can obscure your vision and lead to over-saturation of soft grays. Using Intenze Cleanze throughout the process allows you to neutralize this redness and see the "true" fluid gradients in real-time. This specialized formula removes excess pigment and surface bacteria without the harshness of traditional green soap, preserving the integrity of the skin's lipid barrier. By keeping the skin calm, you ensure that the delicate "ghosting" techniques used for water and bubbles aren't lost in a sea of irritation.
Immediate Post-Session Care
The first 48 hours are the most critical for setting the stage for crisp fluid edges. You must reduce inflammation immediately to prevent the "weeping" of lymph and excess ink, which can pull pigment out of the dermis. Intenze Cleanze should be used for the initial wash to strip away debris without irritating the "soft" work. This sets a clean foundation for the epithelial reconstruction process. If the client fails to maintain this sterile environment, the resulting scabbing will inevitably tear through the fine highlights of your liquid chrome, leaving behind permanent gaps in the reflection.
The Science of Healing Fluid Effects
Accelerated epithelial reconstruction is the goal of any professional aftercare regimen. Intenze Tattoo Salve is formulated to support the skin’s ability to "hold" high-detail reflections by providing a breathable, protective barrier. However, you must educate your clients on the dangers of over-moisturizing. Excess moisture can soften the skin too much, leading to pigment spread that kills the contrast in a liquid piece. Creating convincing liquid and fluid effects in tattoos requires the skin to heal tight and flat. Over time, the ink will naturally "settle" as the epidermis regenerates, but by using laboratory-grade pigments and a disciplined aftercare routine, you ensure that the transparency and "soul" of the work remain vibrant for a lifetime legacy.
Command the Current: Your Legacy in Fluid Realism
The transition from a flat image to a living masterpiece depends on your ability to weaponize the physics of light within the dermis. By mastering refraction, surface tension, and the precise chemistry of pigment suspension, you move beyond mere decoration. You've learned how the right shading solution preserves the integrity of your work and why absolute blacks are non-negotiable for metallic depth. Creating convincing liquid and fluid effects in tattoos is a technical revolution that defines your status as a modern pioneer. It's about refusing to accept the limitations of the medium and pushing for elite performance.
We provide the foundation for that excellence with products developed by industry legends Mario Barth and Bob Tyrrell. Every bottle is REACH compliant, vegan, and engineered for the world's elite realism artists who demand absolute perfection. Your vision shouldn't be hindered by inferior materials that blur or gray out over time. Elevate your realism with the Bob Tyrrell Black & Grey Set and Zuper Black at IntenzeTattooInk.com and secure your place at the forefront of the industry. The future of the craft is in your hands; make it vibrant.
Expert Insights: Fluidity and Precision in Tattooing
What is the best black ink for creating high-contrast liquid reflections?
Zuper Black is the definitive choice for creating the high-contrast "void" essential for liquid reflections. Its extreme pigment load ensures that shadows remain deep and opaque, providing the necessary anchor for negative space or white highlights to appear brilliant. Without this level of saturation, your reflections will lack the optical "snap" required to simulate polished, reflective surfaces like chrome or mercury.
Can I create realistic water effects using only gray wash?
You can't achieve true hyper-realism with gray wash alone because liquid depends on a full spectrum of contrast. Creating convincing liquid and fluid effects in tattoos requires the juxtaposition of absolute blacks and bright highlights. While a set like the Bob Tyrrell Black & Grey Set provides the perfect middle values, you still need a foundational black and sharp highlights to sell the illusion of light passing through a medium.
Why do my fluid effects look muddy after the tattoo heals?
Muddy results often stem from poor pigment suspension or aggressive immune responses during the initial healing phase. When you use inferior carriers like distilled water, pigment particles settle unevenly, causing fine gradients to blur into a singular gray tone. Utilizing laboratory-grade pigments like the Gen-Z line and a dedicated shading solution minimizes this migration, preserving the clarity of your fluid effects for a lifetime legacy.
How do I make a tattoo look 'wet' or 'glossy'?
The "wet" look is an optical illusion created by sharp, specular highlights placed against deep, saturated shadows. You must map your highlights to a single, consistent light source and ensure the edges of those highlights are crisp rather than soft. This high-contrast approach mimics the way light reflects off a surface with high tension, providing that signature glossy finish that appears to sit on top of the skin.
What is the difference between shading solution and distilled water for diluting ink?
Distilled water lacks the chemical humectants and surfactants found in Intenze Special Shading Solution. Water breaks the surface tension of the ink, leading to pigment clumping and inconsistent washes that heal patchy. Our solution is engineered to match the ink's own viscosity, ensuring every dip provides uniform saturation and a smooth "slip" for the untraceable gradients required in fluid realism.
Do I need to use white ink for convincing fluid highlights?
While negative space is effective for "windows" of light, Intenze Snow White is essential for the final specular highlights that provide the 3D "pop." Pure white ink acts as the brightest point of reflection, simulating the concentrated light seen on the crest of a ripple or a water droplet. It's the final touch that transforms a flat gray design into a dynamic, moving volume.
How do I prevent fine lines in ripples from blowing out?
Fine lines blow out when the pigment is placed too deep or when the carrier allows the ink to spread in the dermal tissue. Using Intenze Color Lining Solution stabilizes the pigment particles, preventing them from migrating beyond the intended boundaries of your ripples. Controlling your needle depth and using a high-dispersion ink are the final steps in maintaining those razor-sharp fluid edges.
Is Gen-Z ink suitable for the soft gradients required in realism?
Gen-Z ink is specifically engineered for the sophisticated demands of modern realism and soft-edge gradients. These pigments are REACH compliant and sterile, offering a level of safety and performance that meets the industry standards of 2026. The advanced pigment dispersion in this line allows for seamless transitions and transparent layers, making it the premier choice for creating convincing liquid and fluid effects in tattoos.